Paddle
SaaSBold comes with Paddle integration to manage subscriptions. This part of the documentation will show you how to integrate Paddle into your SaaS boilerplate.
Overview
Paddle provides a comprehensive solution for handling subscriptions and payments in your SaaS application. This guide will walk you through the steps to set up Paddle, including creating products, generating required tokens, and configuring webhooks.
Note
If you want to use another payment provider option for integration, skip this step. Instead, follow the LemonSqueezy guide or Stripe guide to integrate subscriptions.
To integrate Paddle, you need a Paddle account. For testing purposes, you can create a Sandbox (opens in a new tab) account. When you are done testing, replace the credentials with the live account's credentials.
Create Product
To begin integrating Paddle, you need to create a product:
-
Log in to your Paddle account.
-
Go to Catalog > Products, and click on the "New Product" button and add the products.
Once you have created a product, you will see the product like this:

-
Set Pricing: After creating the product, click the "View" button. Then click on the "New Price" button and add pricing details.

-
Once you are done, your product page should look like this.

Copy the price_id and update it in the
pricingData.tsfile, along with theunit_amountto match your set price.
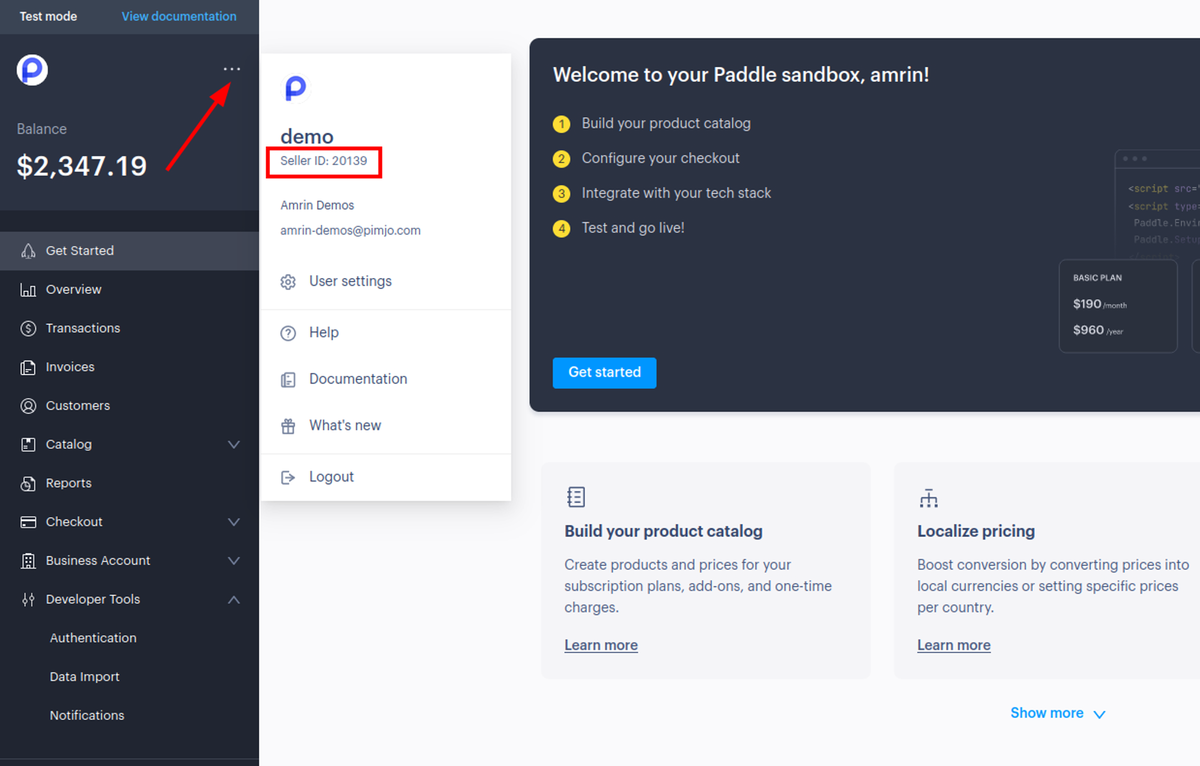
Get The Seller ID
The Seller ID is required to enable checkout on the boilerplate.
Log in to your account, click on the three dots, and you will see the Seller ID there.
Copy the Seller ID and update your environment variable:
NEXT_PUBLIC_PADDLE_VENDOR_ID="YOUR_SELLER_ID"Generate Client Token
Now, we need a client-side token for authentication:
Navigate to Developer Tools > Authentication > Generate client-side token. Generate a Client-side token if you don’t have one.

Copy the generated token and update your environment variable:
NEXT_PUBLIC_PADDLE_CLIENT_TOKEN="YOUR_CLIENT_SIDE_TOKEN"API Key
Now, we need the API token to perform API requests with the Paddle API.
Go to Developer Tools > Authentication > API Keys and generate a key.

Copy the API key and update your environment variable:
PADDLE_API_KEY="YOUR_API_KEY"Webhook Integration
Now that we have all the keys, let’s integrate Webhook to save the subscription data on the Database.
-
Add Webhook: Navigate to Developer Tools > Notifications , and click on the "New Destination" button.

-
Webhook Details: Provide a short description and add the Webhook URL, which is:
yoursite.com/api/paddle/webhook -
Select Events: Finally, select the events, for now, you can select all. You can disable the one you don’t need later.
Once you are done, click on the Edit Destination button. You will see a Secret Key there.
After saving, copy the Secret Key and update your environment variable:
PADDLE_WEBHOOK_SECRET="YOUR_WEBHOOK_SECRET"
Paddle API URL
Finally, we need the Paddle API URL.
Paddle provides separate APIs for live and sandbox (for Testing) environments.
# Live API url
NEXT_PUBLIC_PADDLE_API_URL="https://api.paddle.com/"

# Sandbox API url
NEXT_PUBLIC_PADDLE_API_URL="https://sandbox-api.paddle.com"
Tips
- Testing: Always test your integration thoroughly in the sandbox environment before switching to the live environment.
- Documentation: Refer to Paddle’s official documentation for detailed guidance and troubleshooting.
- Security: Ensure all API keys and secrets are stored securely and not exposed.
- Event Selection: Carefully select the webhook events relevant to your application to avoid unnecessary data processing.
Summary
By following these steps, you will have integrated Paddle into your SaaSBold boilerplate, enabling robust subscription management. Test the integration thoroughly using the sandbox environment before moving to the live environment.